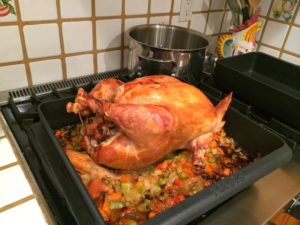
Okay. So I haven’t posted to this blog since January. And Thanksgiving was last Thursday. But that doesn’t mean I can’t post my roast turkey recipe now! And if I do it now, it’ll be written down before I forget it again next year.
There are many schools of thought on cooking a turkey. But something that everybody who knows something about cooking turkey knows is: you’ll get much better results if you don’t stuff it.
The “traditional” method (that is written on the side of the frozen turkey bag) has low heat (325F) for 15 minutes a pound. But this doesn’t actually yield very good turkey, and 325F isn’t hot enough to brown the skin to give you that nice roasted-turkey look.
But then there are people who say you should put it in high heat first, then low heat. Or low first then high. Or you should deep fry it. (This is slightly dangerous, but yields a good turkey).
Anyway, what do I do for Thanksgiving every year? That I can answer. I learned this method in my professional cooking class. It works well, and can be applied to any bird, though I’ve only roasted chickens and turkeys. You need to keep an eye on the bird — the cooking time depends on the size of the turkey! But it’s considerably less than the canonical 15 minutes per pound. This Thanksgiving, the 20 pound turkey took about 2 hours and 40 minutes.
Dry-Brined Roast Turkey
Turkey
Salt
brining bag (plastic bag large enough to hold the turkey and be closed)
roasting pan large enough to hold the turkey. No need for a special rack!
kitchen string
Onions (3-5 large onions)
Shallots (2-3)
Carrots (see below)
Celery (see below)
Rosemary
Thyme
Other Herbs
First: the “dry brining”. There are a few schools of thought on brining a turkey (which is basically salting it in advance.) The eminent food scientist Harold McGee doesn’t like brining. But I figure: you’re going to salt the bird, so why not do it in advance so that the salt can penetrate the skin which helps it keep moisture when it cooks?
The easiest dry brine is the “Judy Bird”. First, remove the neck and giblets from the turkey. (Use the neck to make stock for gravy if you wish, but that will have to be another post.) Then, wash the turkey inside and out and pat dry with paper towels. Then take 1 Tbs of salt for each 5 pounds of bird (e.g. our 20 pound bird required 4 Tbs of salt). Sprinkle some on the inside, and then rub the rest liberally around the full bird. (See the link for excruciatingly detailed instructions.)
Note that if you don’t have the full amount of brining time (a couple of days), at this point you don’t need to go through the whole rigamarole. But no matter what you do, you will want to rub salt on the bird! If you have the time, put the turkey in the brining bag, close it up, and put it in the fridge for 1-3 days. At least 8 hours before you will start roasting, take the bird out of the bag and put it back in the fridge. This will help dry out the skin which will help to give it the nice color. A couple hours before roasting, take the bird out of the fridge to bring it closer to room temperature.
We will be roasting the turkey on a mirpoix, which is a mix of 25% coarsely chopped carrots, 25% coarsely chopped celery, and 50% coarsely chopped onion. How much you will need will depend on the size of the roasting pan. A typical roasting pan will require a 2-3 onion mirpoix.
Next, chop some aromatics for the inside of the turkey to add some flavor. I recommend some sliced onion, shallot, rosemary, and thyme. This should be very coarse.
Chop off the wings. These are useless except for propping up the turkey.
Put the aromatics inside the turkey and tie the legs closed with kitchen string. You want the turkey to be as compact and non-flapping-about as possible (hence cutting off the wings).
Lay out the mirpoix in the roasting pan, put the wings on the mirpoix, and then put the turkey breast side down. You should also pour ~1/4-1/2 cup water in the roasting tray so that the bottom is moist. This will keep the turkey moist and the veggies from over-caramelizing (eg. burning). Occasionally check during cooking to make sure that there’s liquid on the bottom of the pan (Eventually this will be tasty turkey juice).
Heat oven to 350F (195 C).
Put turkey in the oven breast side down for 45 minutes. (Note that I did 60 minutes for the giant 20 pound turkey.)
After 45 minutes, turn oven to 400F (220 C) and flip the bird so that it is breast side up. This is a bit of a challenge, but can be accomplished if you’re careful! It should roast breast side up for ~60 minutes until it is nice and brown and the internal temperature in the thigh is 158F (88C), and the juices run clear. If it’s over-browning you can turn it down. During this phase I recommend rotating the pan (not flipping the bird!) every 20 minutes to ensure that both sides of the turkey get equal heat. Often turkeys can be large enough that they impede the flow of air in the oven making this necessary.
Take the turkey out of the oven and cover with a foil and a towel for ~15 minutes to let it rest and finish cooking.
And that’s it!


Leave a Reply